


Find the right location
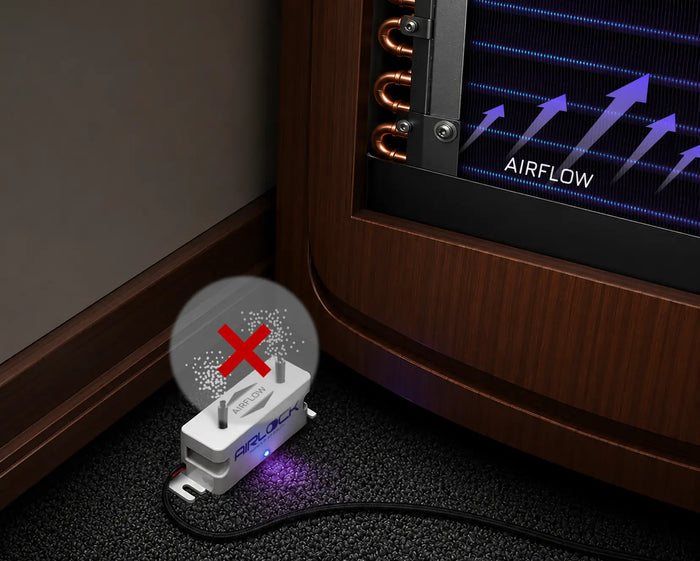
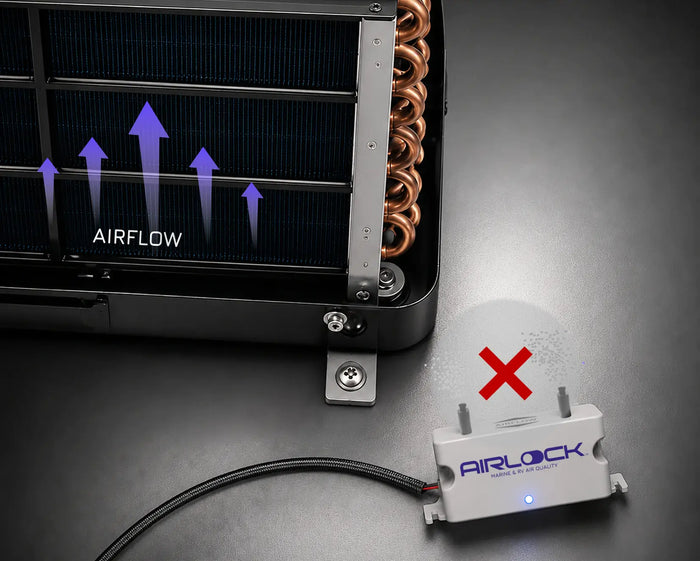
- AIRLOCK One should be installed proximal to the AC intake airflow, to ensure that the airflow passes directly through the ion emitters.
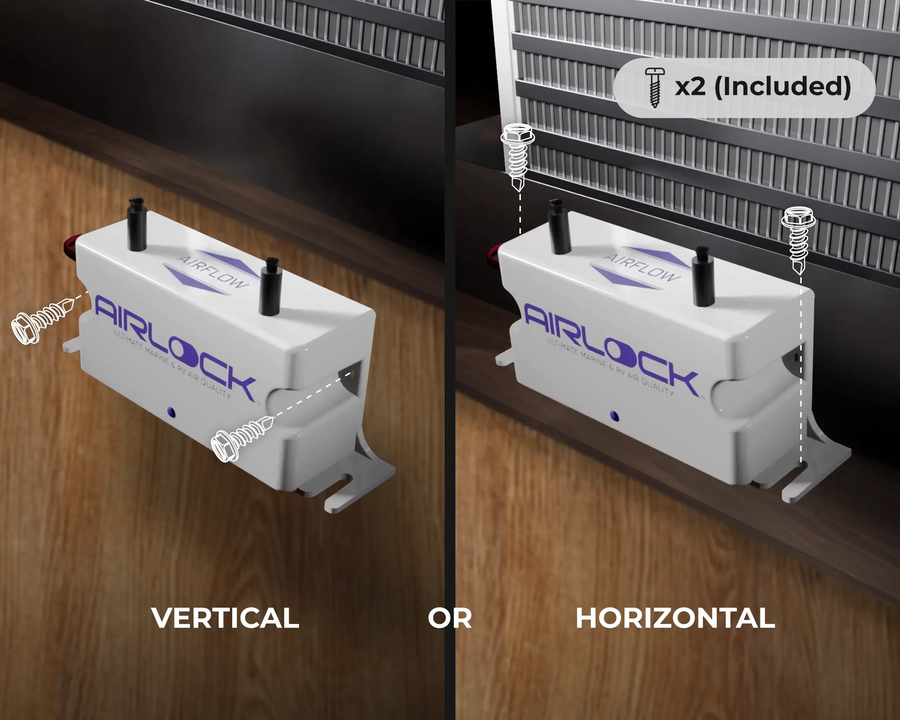
- AIRLOCK One can be installed in any direction—upright, upside down, or sideways.
- The ideal mounting location is directly in front of the AC filter and coils (cooling fins). However, depending on the boat’s design and construction, this may not always be feasible. If the device cannot be centered at the base of the AC unit, use a side-mount or inverted-mount configuration, positioning it as close as possible to the AC intake airflow path.
- AIRLOCK One relies on the AC unit's airflow to carry its purifying ions — if the intake is blocked or no air is being drawn in, the ions can't reach the cabin and the air won't be purified.
- Make sure the ion emitters don’t touch any surface to avoid interference or damage.
Mount directly and securely in the intake airflow path
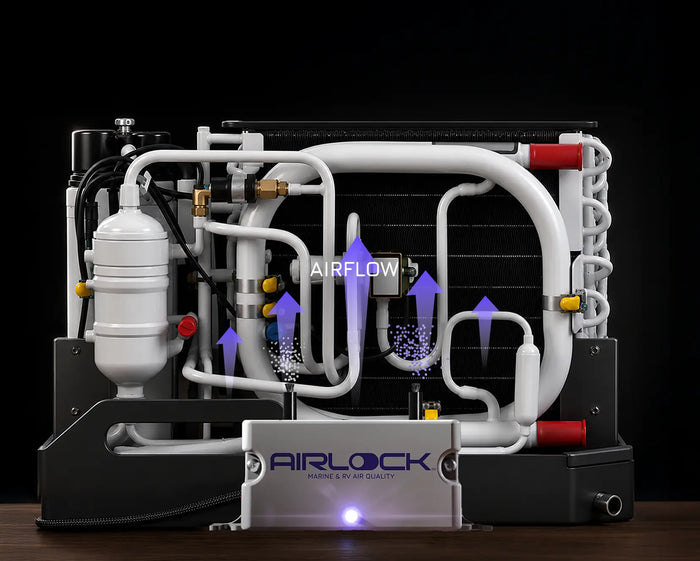
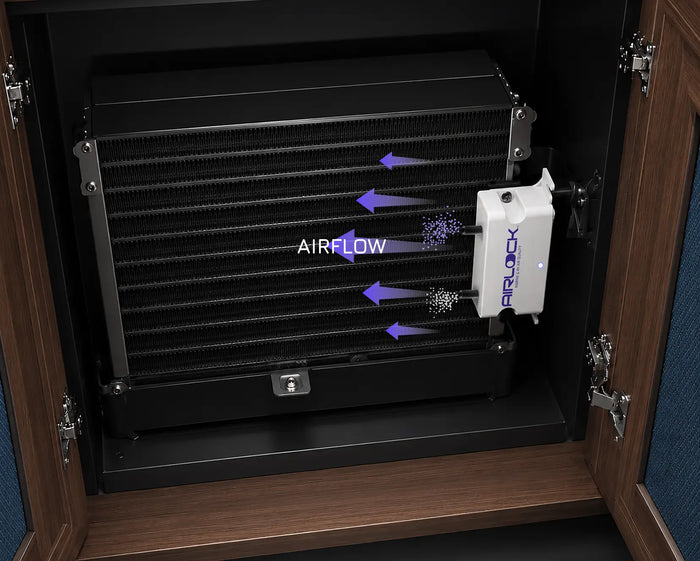
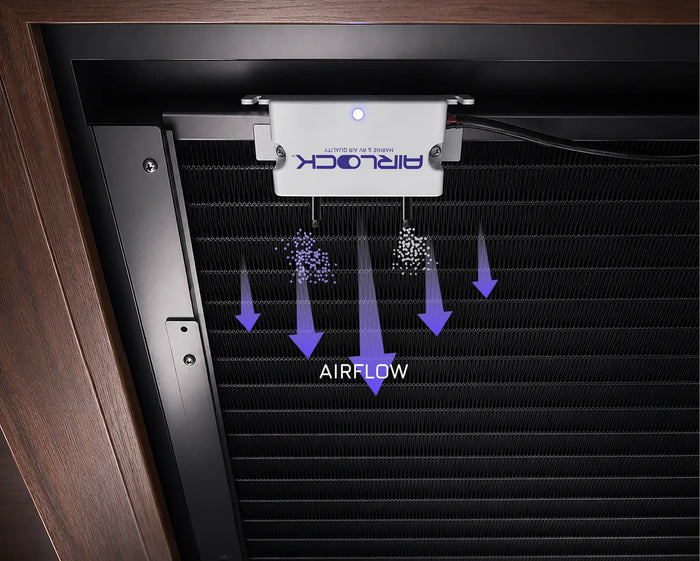
Do not mount outside the intake airflow path or leave it unsecured
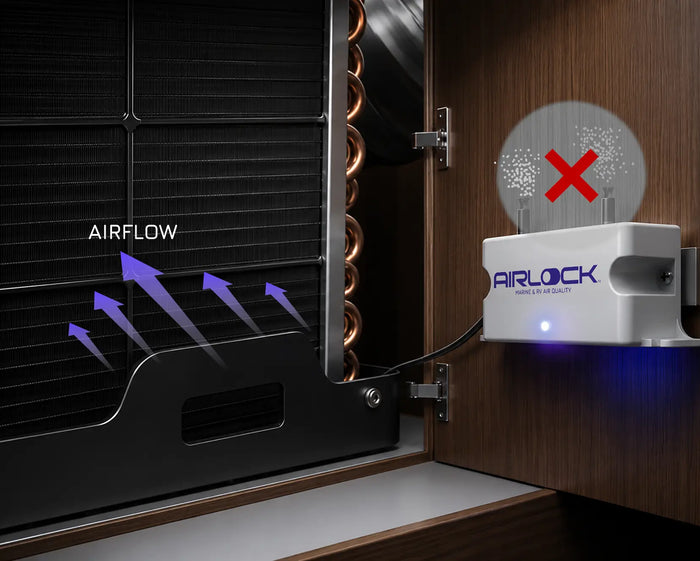
Mount the device
- AIRLOCK One can be mounted in 2 different ways. Every boat is different, so we encourage you to use the one that suits your needs best.
Option A
MAGNETIC MOUNTING PLATE
- Clean the surface where you want to attach the magnetic mounting plate. Ensure the surface is free from humidity, dust, grease, and oil.
- Separate the magnetic mounting plate from the magnets.
- Peel off the red liner to expose the adhesive and firmly press the plate onto the cleaned surface for at least 10 seconds.
- Wait for 10 minutes to allow the adhesive to bond properly.
- Bring the AIRLOCK One close to the mounting plate and let the magnets attract to it.
Option B
SCREWS
- Firmly secure the device using the included self-drilling screws. The device can be installed either vertically or horizontally, based on your preference and needs.
- When attaching the device to a grille or screen, nylon ties may be used.
- The ion emitters should not touch any metal surface or wires. Move and secure any wires that may come in contact with the ion emitters.


Locate the AC unit's wiring compartment
- Identify your marine A/C unit's wiring compartment (sometimes called "electrical box", "control box," "junction box," or "terminal box"). It's typically a covered enclosure on the side or back of the unit. If you can't find it, refer to your A/C unit manual.
- Remove the cover to expose the terminal block where the power wires are connected.

Connect to power
- Ensure power to the A/C unit is off at the breaker.
- Locate the labels (e.g. L, N, L1, L2…) on your unit's terminal block. Check:
- The block itself
- A wiring diagram inside the electrical box
- Or your AC unit’s manual
- Now connect based on what you found:
Your terminal labels Red wire → Black wire → L (or L1) and N L (or L1) N L1 and L2 L1 L2 - To connect each wire: using a screwdriver, gently loosen the screw on that terminal, insert the wire, and tighten it back down.
- Optional: if you'd rather AIRLOCK One only run while the A/C is actively running, you can connect it to the fan's power source instead.

Turn on the power supply
- Check the device is secured and correctly wired.
- Turn on the power supply. A purple LED indicator will illuminate constantly when the device is working properly.
- To verify output, take a non-contact voltage reader and place it near the ion emitters it should indicate voltage.
- AIRLOCK One can remain powered at all times.
 US & CANADA
CERTIFIED SAFE CERTIFIED
OZONE SAFE MEETS EU
STANDARDS MEETS UK
STANDARDS EU CERTIFIED SAFE
NON-TOXIC EU CERTIFIED SAFE
NON-TOXIC


CONFORMS TO UL STD 867
CERTIFIED TO CSA STD C22.2 No. 187
Meets California ozone emissions limit: CARB Certified


- Model Number
- AL-1000
- Rated Voltage
- 100-240V AC
- Rated Current
- 10mA
- Power Consumption
- 2.4W (Max)
- Rated Frequency
- 50/60Hz
- Fuse Rating
- 3A

- AIRLOCK One
- Power wires with fork terminals
- Pre-installed magnets
- Mounting Plate (stainless iron sheet bonded to red 3M VHB adhesive tape)
- Hex-head self-drilling screws



The science behind fresh boats
AIRLOCK One uses your boat's AC system to purify the air and continuously eliminate odors, bow to stern, powered by bipolar ionization, the same technology trusted in hospital HVAC systems.

Ion Generation
AIRLOCK One uses Bipolar Ionization to treat your boat's air. Two carbon-fiber brushes—one positively charged, one negatively charged—react with water vapor (H₂O) to create hydrogen (H⁺) and oxygen (O₂⁻) ions, which flow into your AC system.

Ion Flow
Once released, the ions travel through your boat's ductwork via the AC system. As air circulates, they reach every surface, from cushions to wall panels to the hard-to-reach spots where odors tend to linger.

Ion Discharge
These charged ions actively seek out airborne pollutants like odor-causing molecules, mold spores, allergens, bacteria, and dust. They attach to the particles and break them down at the molecular level, right where they float in your cabin air.

Particle Neutralization
As the ions do their work, the neutralized particles clump together and grow heavier. No longer able to stay airborne, they fall out of the air and are captured by your AC filter, cleared from the cabin for good.

Long-Lasting Effect
Once their job is done, the ions naturally revert back into water vapor, and the cycle begins again. This self-sustaining process keeps your cabin air fresh continuously, with no filters to replace.
Stick the Magnetic Mounting Plate near your AC unit.
Attach the device to the Magnetic Mounting Plate.
Connect to power and enjoy fresh, clean air!

Sail Life
“It's been a week since I installed the AIRLOCK One, and it's made a difference. The smell we had is completely gone!”

InTooDeep
“It’s been a year since I have the AIRLOCK One running and I just have to tell you that it's legit... I especially noticed it when I shut the HVAC off to haul the boat out, and the boat smell hit me. That's exactly why I recommend them.”

Expedition Engineering
"I bought an AIRLOCK One at first to try it out and then had to buy a second AIRLOCK One because I liked the first one so much!"

Tula's Endless Summer
"We installed AIRLOCK One units on all of the AC air handlers and that's been working amazingly against boat smells."

Mathers on the Map
"The AIRLOCK One has been good to us so far. It eliminates that musty smell we had on our boat ."

Beau & Brandy
"I can leave the boat for a week with the AIRLOCK Voyage running and come back and it smells amazing. Our boat is from 1971, so she smells like an old boat, but now there's no smell."

Elli-Yacht
“After 3 months with AIRLOCK on board, we’ve done the taco test, pump-out test, diesel test, dog test, barf test—you name it. We've tested everything, and it’s amazing. There’s no smell at all!”

Sailing Free Spirit
“I was done dealing with smells—I was frustrated. Then I saw their ad claiming it’s a permanent solution. I believe them. I use AIRLOCK on my boat, and it works. Two thumbs up!”

GenXPats
“I’ve been completely thrilled with the results after installing the AIRLOCK One systems. I honestly smell nothing but fresh air.
When we came back to the boat, we were nearly knocked over by the bathroom smell—so we plugged the AIRLOCK Voyage back in, and no joke, 10 minutes later the smell was gone.”

“We installed a couple of these on our dad’s boat, which had some musty smells. When my mom got onboard after we installed them, she immediately noticed the smells were gone! I’m super excited to install my own AIRLOCK and get rid of all the stinky smells. If I were you, I’d get an AIRLOCK!”

Capt. Ricky Wheeler
"I was skeptical, but after fishing daily for 3 weeks and installing the AIRLOCK One, it kept the salon on our 60-foot boat smelling great—even with guys in and out 24/7, sweat, and fish. I vouch for AIRLOCK—it really works!"

The Siren's Log
"We installed our AIRLOCK One today, and we can already confirm it’s made a huge difference with boat odors and dust. Highly recommended!"

AIRLOCK One and share their first impressions — no scripts, no nonsense, just real results.


Chosen by owners of the world’s top boat brands


Ready to breathe better?
Add AIRLOCK Voyage for faster, targeted odor-control
Take care of quick odor build-ups — like head, cooking smells, or any tight-space funk.
Give your boat an extra layer of defense when fresh air can’t wait.
